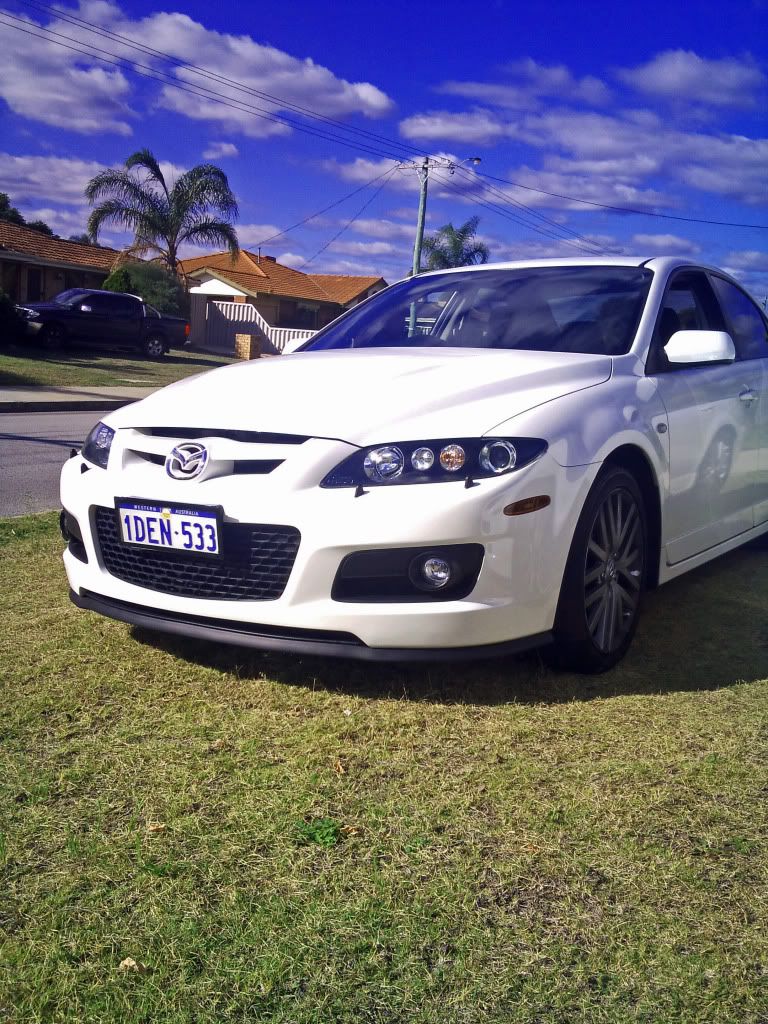
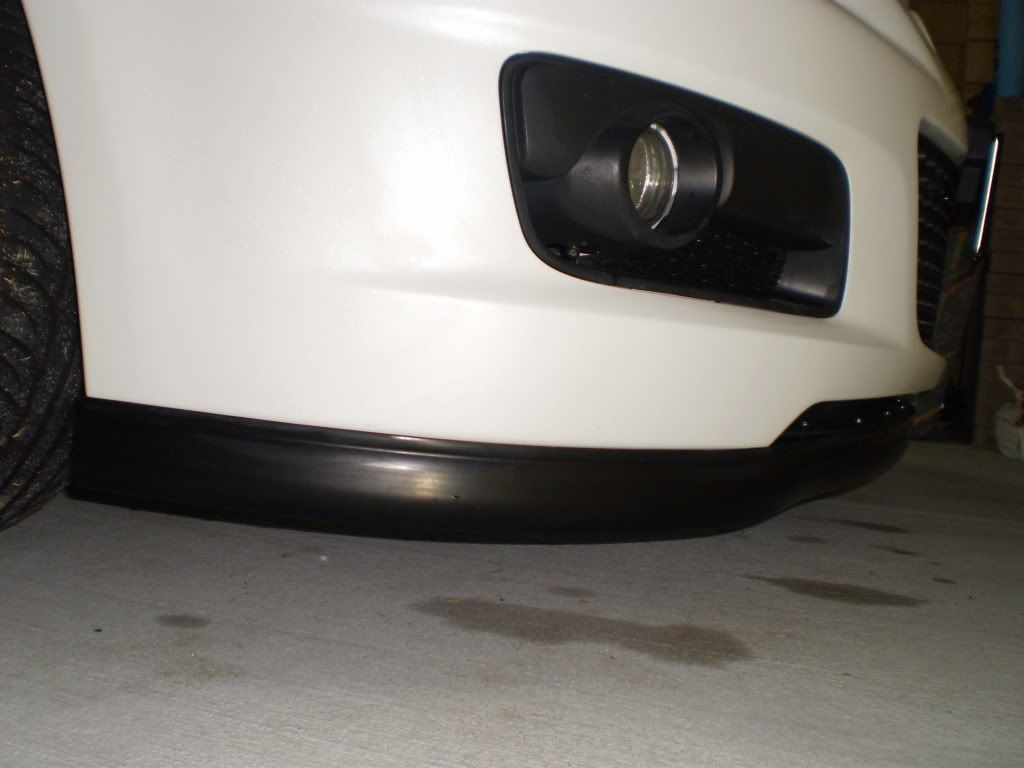
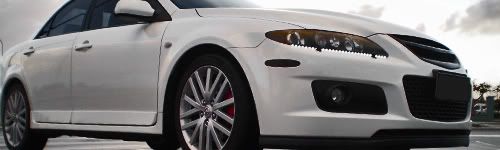
Lip was installed this arvo.
wont go into it much cos i'm sure Rog will post some pics and details soon.
Hope these pics work, never used Photo bucket before


 Forum Addict

Lip was installed this arvo.
wont go into it much cos i'm sure Rog will post some pics and details soon.
Hope these pics work, never used Photo bucket before
Last edited by shakespeare; 16-05-2010 at 04:12 PM. Reason: Added IMG to links
Senior Member

Looks the goods
Just placed my order.
I could not find anything at Clark Rubber that looked like it would work either
Forum Freak
Thanks for the pics. The lip looks really good and has an OEM appearance. Look forward to seeing it in the flesh.
Full Member
ohh!
that's what i want
looks great man!
Forum Addict
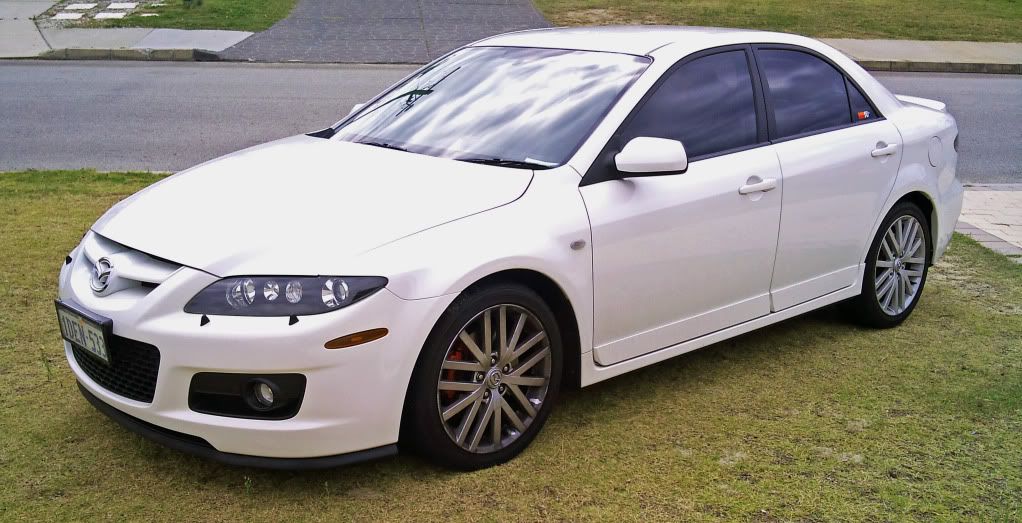
More Pics coming soon.
I also installed a different lip this morning so will upload side by side pics shortly
---------- Post added at 01:43 PM ---------- Previous post was at 01:11 PM ----------
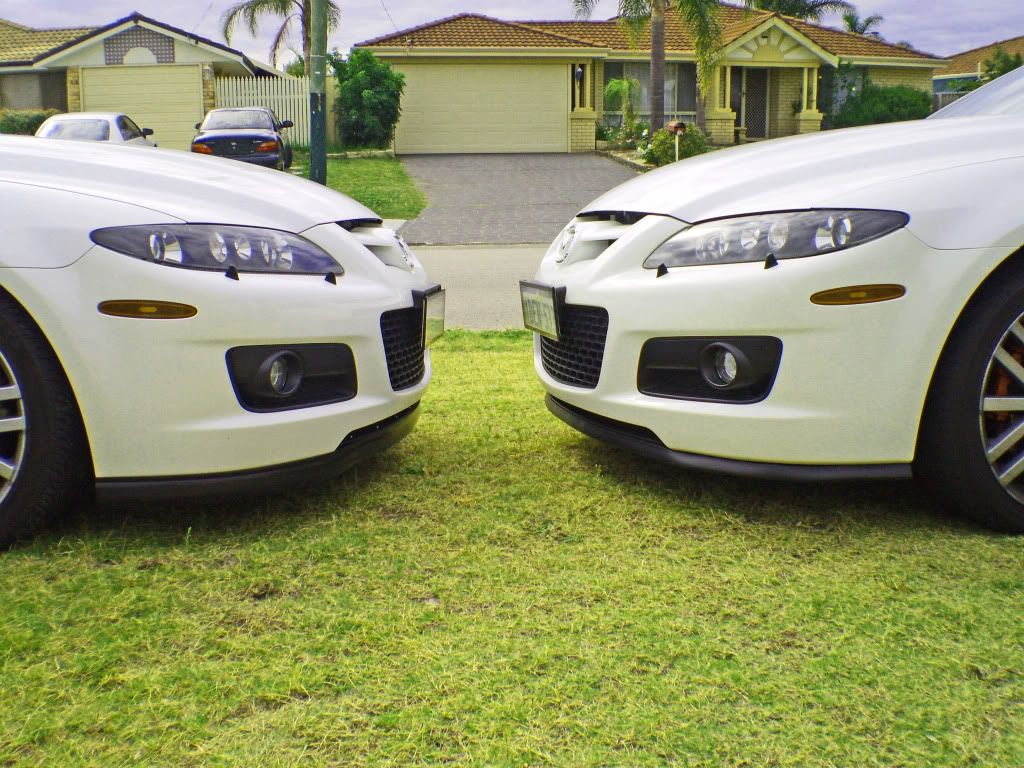
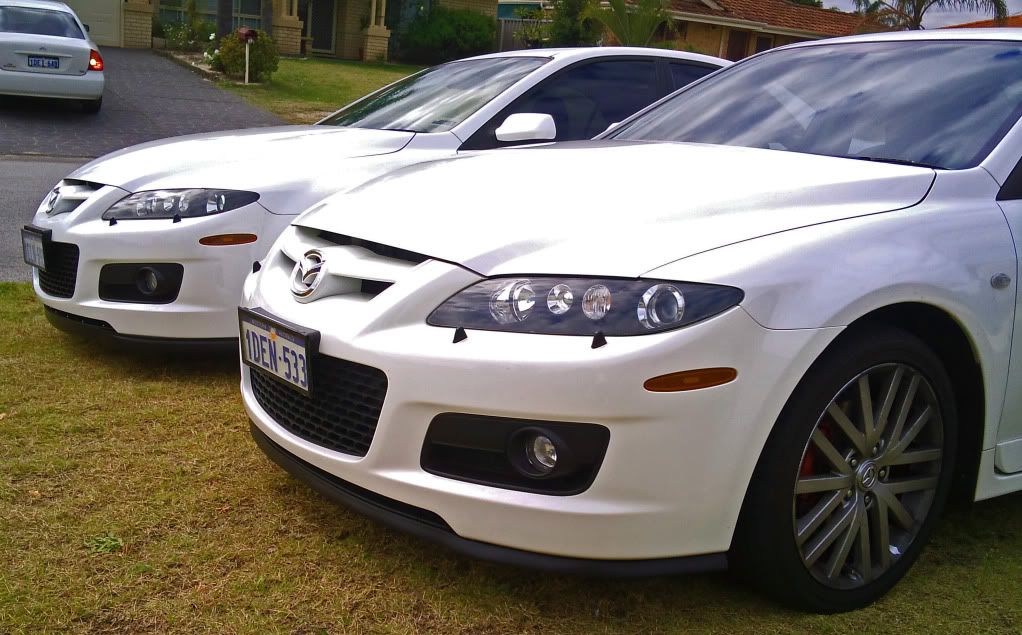
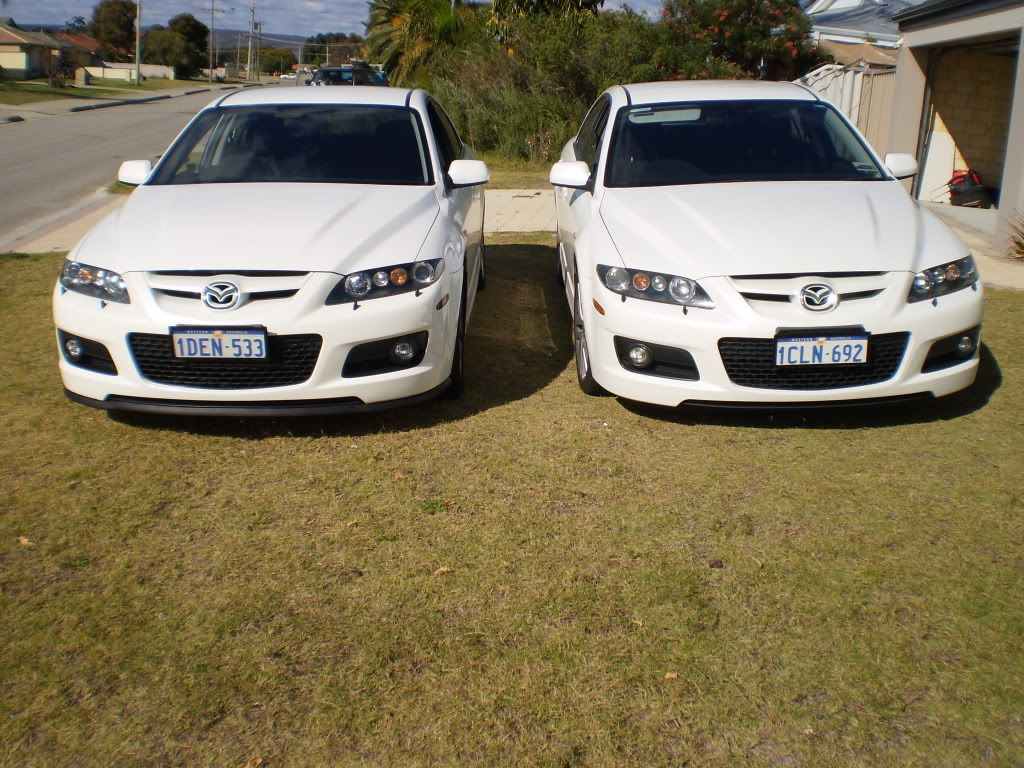
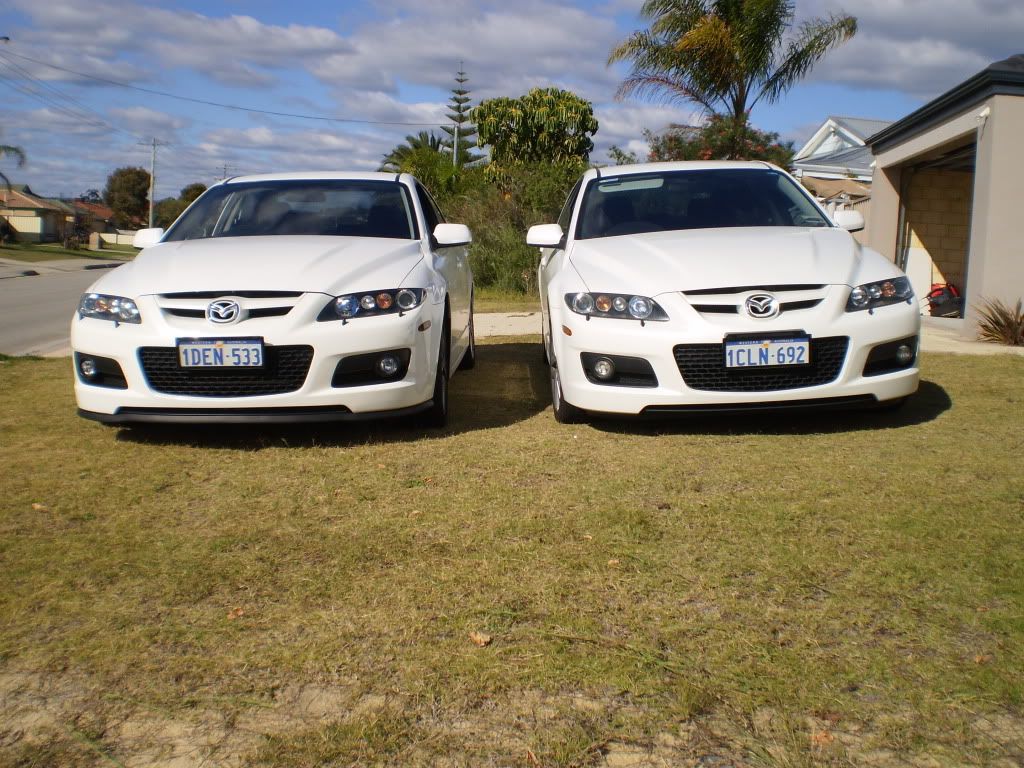
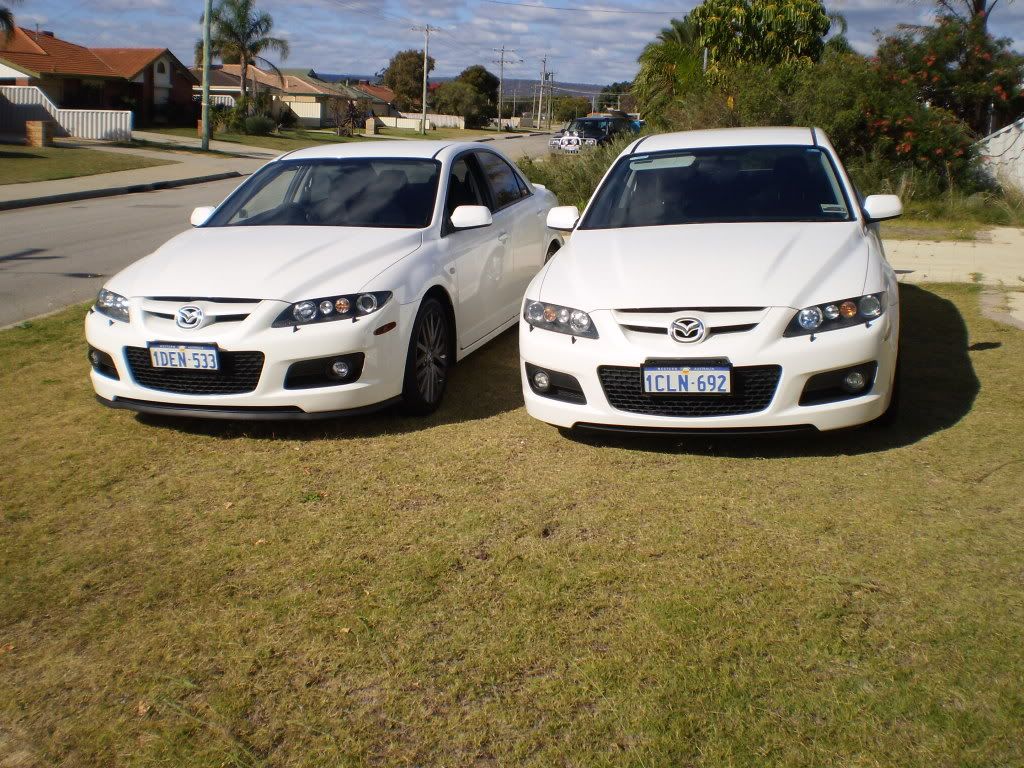
Heres the side by side pics of the 2 different front lips.
First pic shows revision 2 lip (Toddy) on the left, compared to revision 1 (Rog's car)
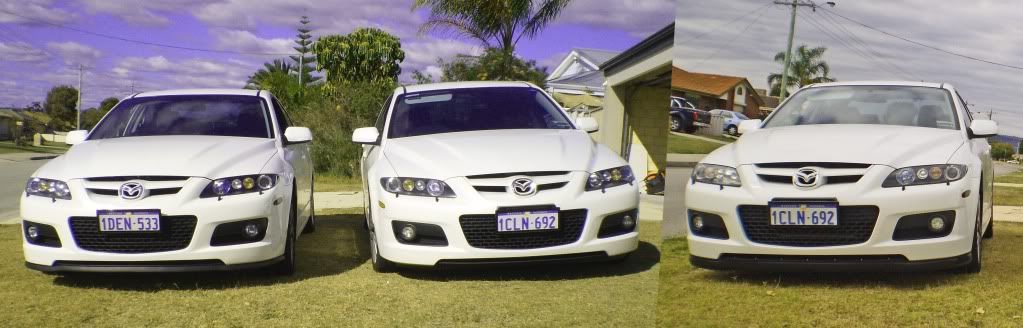
Second pic shows Rog on the left, stock in the middle and me on the right
Let us know what you think?
cheers
Last edited by shakespeare; 16-05-2010 at 04:15 PM.
Life Member
Looks great, good work guys (I edited your post to show the pics)
I'm keen on both! They both look good possibly Rog's looks a bit more agressive and Toddy, yours looks more subtle.
Forum Addict
Thanks for putting the pics into the post. I couldn't figure out how to do that.
I like both personally. There is a third option but we ran out of MPS's to test on. Its similar size to mine but sticks out the front more.
Adios
Hi guys is it possible to have some closer pics profile view ... great job ... maybe you need a silver MPS6 to try the third option on ... Mal
How may I service you...
Thanks for the feedback on the Front Lips. Both Toddy and I were pretty happy with the results. Since we've had a bit of feedback I thought I would break it down a bit for those interested in doing it themselves. Please note, Amazon.com sent me the wrong item (soft rubber) and I chased them up for the hard rubber. They apologised and then sent the exact same soft rubber again! So my guess is they falsely advertise they have the hard rubber or they don't know the difference. Generally its pretty hard to Find the Frost King rubber that I used in the hard form...its from the US. I tried http://www.sears.com/ and Lowe's Home Improvement: Buy Kitchen Cabinets, Paint, Appliances and Flooring with no success.
So I'll start with a comparison between Rogwick and Toddy to give a general idea.
Time: 1-1.5 / 1.5-2 hours respectively
Cost for mod: About the same, 50 odd bucks give or take
Difficulty (out of 10): 1 / 2
Selection: Since they sent the wrong one, soft rubber / hard rubber
Clearance: Sits about an inch below bumper / +20mm on top of Rogwicks So far they both clear typical driveways etc
Tools req: Cordless Drill, nominated sized drill bit (ask Toddy) Phillips head screw driver, dual car jacks, Stanley Knife, Scissors, a can of coke each
Fitment type: Self drilling screws (Preferably stainless or Zinc coated), washers, double sided tape / Self drilling screws (Preferably stainless or Zinc coated), washers, nuts and bolts
Start with mine (Rogwick):
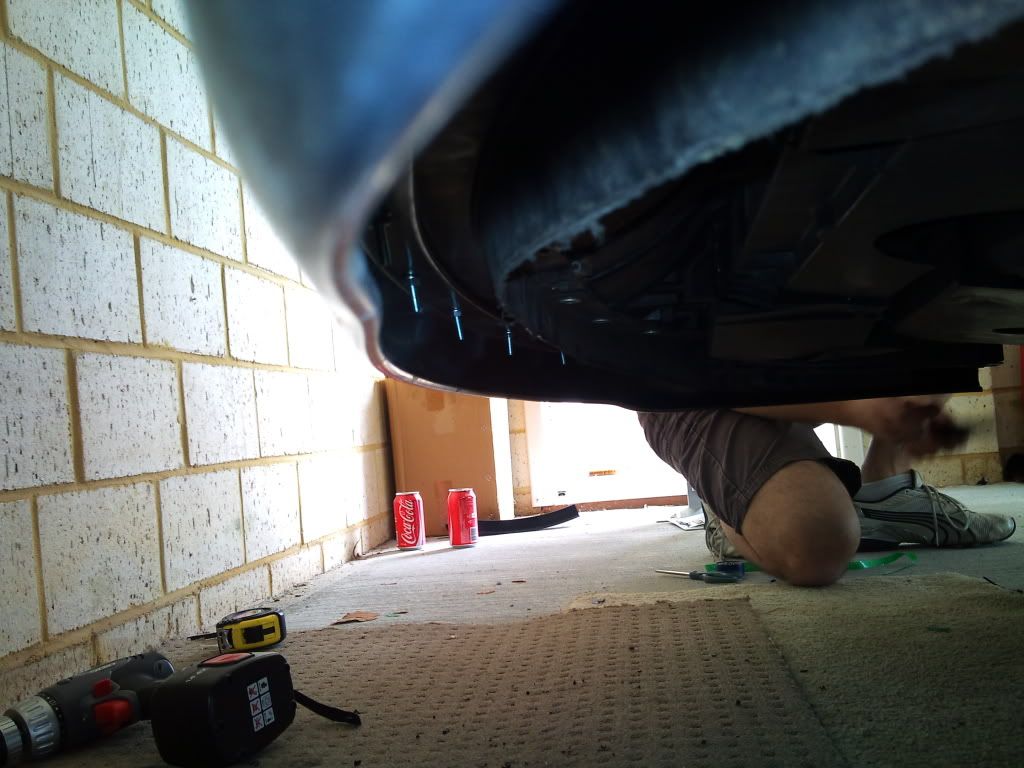
To start, have two car jacks handy. Raise the car *safely* this involves working on a flat surface, placing bricks or similar behind the rear wheels, making sure the handbrake is on (1 click above usual to be safe) Neutral or first gear is up to up. You will need to raise the car so both front wheels are above the ground about an inch each side.
Measure up the required length of rubber for the Front bumper. Cut it (+ GST, always best to have waste so can trim to fit later) On the ride and left of the bumper, we applied double sided tape at intervals to stick to the underside of the bumper. In between those intervals we placed self drilling screws (with washers) through the underside of the bumper (About 5 each side) The middle of the bumper, we ran pretty much a dual stripping of double sided tape as we didn't want screws sticking though that existing black-lip-vane. Seems to hold just fine. Screwed in both sides and the middle stuck down, trim the end(s). You're done.
Toddy's Lip
To start, have two car jacks handy... ...above the ground about an inch each side (see above)
Attach the Lip to the underside of the bumper. Flush the end. If you have someone handy and bored enough to help, get them to hold it as you screw in through the rubber and penetrate through the underside of the bumper with a self drilling screw. About 4-5 are required for each side to hold it in place, but work as you go, right to left or whichever you prefer. When you reach the middle, mark the spacing for how many bolts you want (best to look even). Mark the locations. Drill a hole through the Rubber and existing black vane from the underside. Place a bolt through from the top down. Screw the nut on the underside. Repeat for the length of the rest of the middle piece. You're done
Repeat procedure for this side (as above) and Self drill screws in through the underside of the bumper. Trim your rubber to flush off with the bumper. You're done. Scratch your head to see if it looks better than Rogwick's lip
Next, Meticulously park your car near you mates car and take random photos of your impressive work and post it on OzMPSclub.com. I also drove past Toddy's place at around 80kmph to see if my rubber lip would bend in the wind. No movement at all.
Summary: about the same price. Toddy's is lower, possibility of scraping? Although he reversed down the driveway and still has at least an inch clearance. But it would be more likely to scrape than mine. Toddy's is stiffer and would have a stronger fitment-in-place. My rubber lip flares out and Toddy's drops down. Mine may rip? Toddy's will not. In terms of looks, personal preference really. The rubber I used is easier to manipulate and follow the curves and of the bumper. There is a step up from the general bumper to the existing black lip vane. We considered using spacers for Toddy's (due to the higher rigidity) but decided to fit without
At the end of the day, a similar outcome but a much better look than standard. Hope this post helps, get out, have fun and install, enjoy.
I took all pictures with my mobile, I don't have a camera, hope they all come out alright once posted
Last edited by rogwick; 17-05-2010 at 02:39 PM.
With great power comes great fuel consumption...
M P S - 6 - RR | Cobb AP | CAI | TIP | ATP GTX28R | 3.25" TMIC | SS DP | REM | 3" Zorst | SSP Anchors & Countershift | DBA Rotors | K/Springs | Upper & Lower Bracing | Alpine Type S 12" sub MRP-M500 Amp| Grille | STi Lip | Shark Fin | 6000K HID | Fog Light Tint | Twin DEFI gauges | Custom Decals & Badges | LED lighting | CF Mirrors & Pillars | Black rims Red callipers
Forum Addict
I will be changing my bolts to Black socket head cap screws tomorrow so they are not visible.
Blackbetty - profile view, as in from the side of the car? I'll see what i can do
How may I service you...
BB, sorry it was getting a little late and my flash on my phone sucks! Photoshop helped a bit. By profile view do you mean on the side?Originally Posted by blackbetty

With great power comes great fuel consumption...
M P S - 6 - RR | Cobb AP | CAI | TIP | ATP GTX28R | 3.25" TMIC | SS DP | REM | 3" Zorst | SSP Anchors & Countershift | DBA Rotors | K/Springs | Upper & Lower Bracing | Alpine Type S 12" sub MRP-M500 Amp| Grille | STi Lip | Shark Fin | 6000K HID | Fog Light Tint | Twin DEFI gauges | Custom Decals & Badges | LED lighting | CF Mirrors & Pillars | Black rims Red callipers
Forum Addict
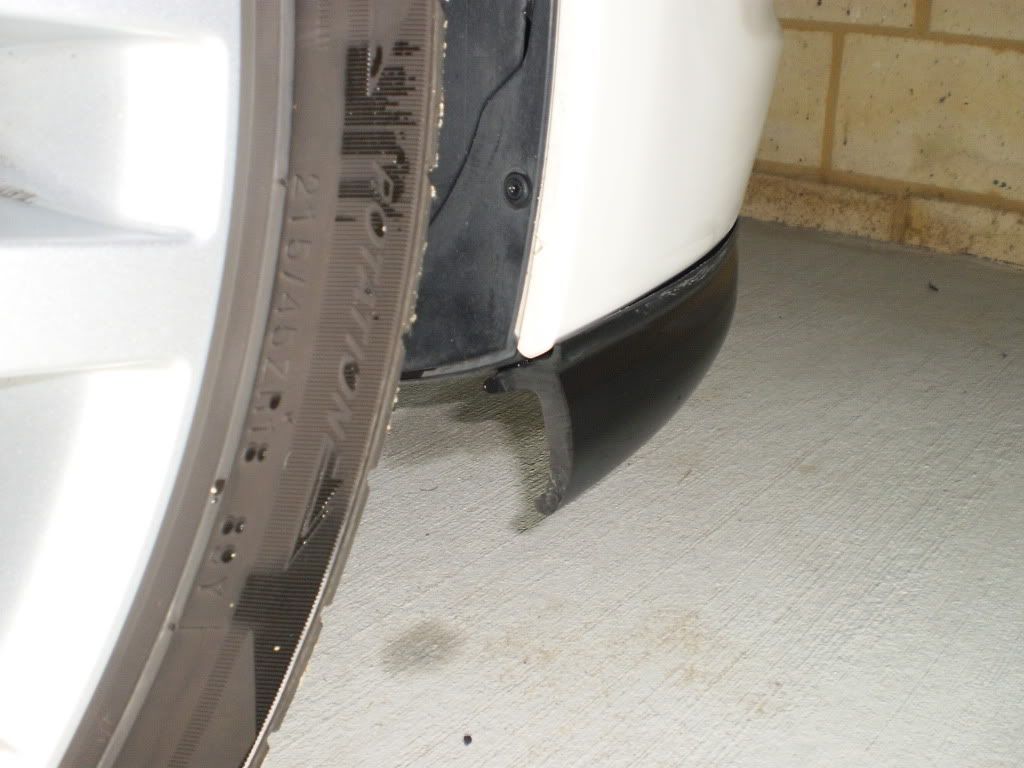
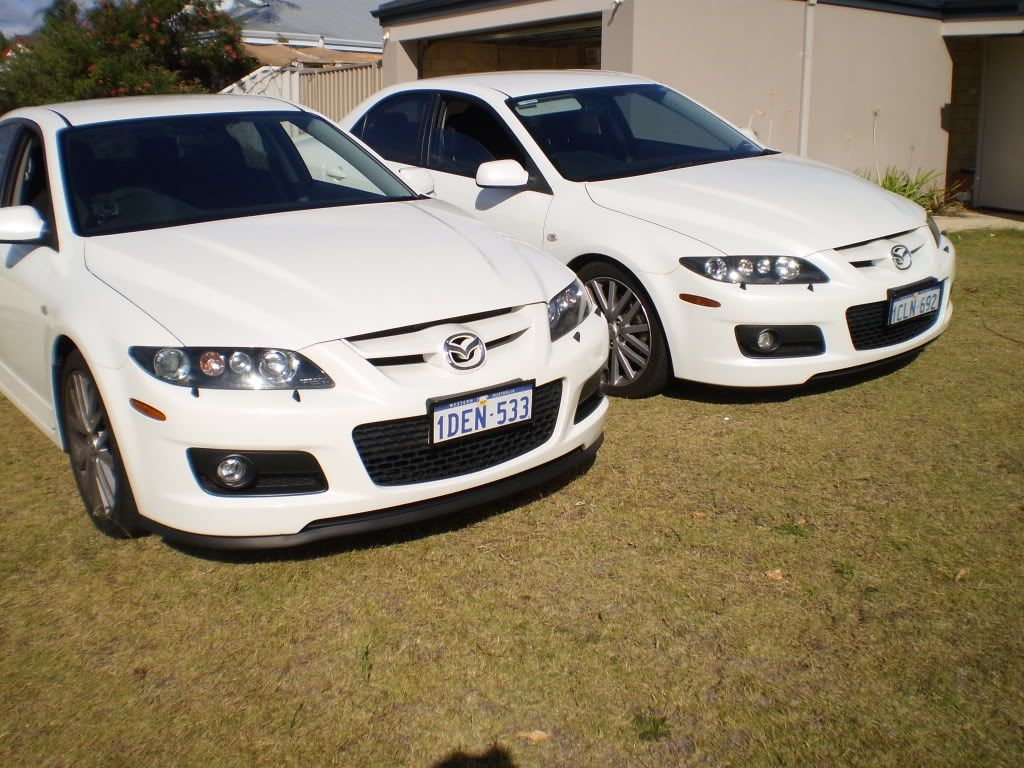
Heres a couple side on pics of mine. Ignore the white residue on the rubber, i'm halfway through polishing the car.
Adios
great side shots Thanks
Baton Relay Coordinator
speed bumps and driveways mst be hell !!!!!
How may I service you...
Not as yet, Toddy's is a bit lower than mine but reversing down the driveway and onto the road there was about an inch or so clearance. If one does happen to hit the ground the rubber would bend out the way. The only problem faced would be wear and tear if it is constantly scraping. Toddy's lip is more likely to suffer scraping damage due to the rigidity of the rubber. Mine is more likely to bend out the way. Seeing as we haven't hit anything yet it might be ok. Can't remember what the measurement was on Toddy's but the clearance on a flat surface was somewhere around 120-125mm *with the car lowered on king springs (low)*
With great power comes great fuel consumption...
M P S - 6 - RR | Cobb AP | CAI | TIP | ATP GTX28R | 3.25" TMIC | SS DP | REM | 3" Zorst | SSP Anchors & Countershift | DBA Rotors | K/Springs | Upper & Lower Bracing | Alpine Type S 12" sub MRP-M500 Amp| Grille | STi Lip | Shark Fin | 6000K HID | Fog Light Tint | Twin DEFI gauges | Custom Decals & Badges | LED lighting | CF Mirrors & Pillars | Black rims Red callipers
Forum Addict
haven't been over any speed bumps yet but driveways seem to be fine so far
How may I service you...
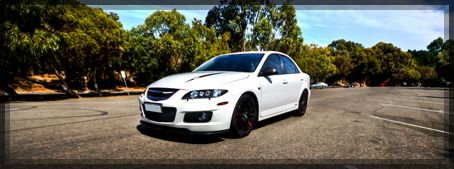
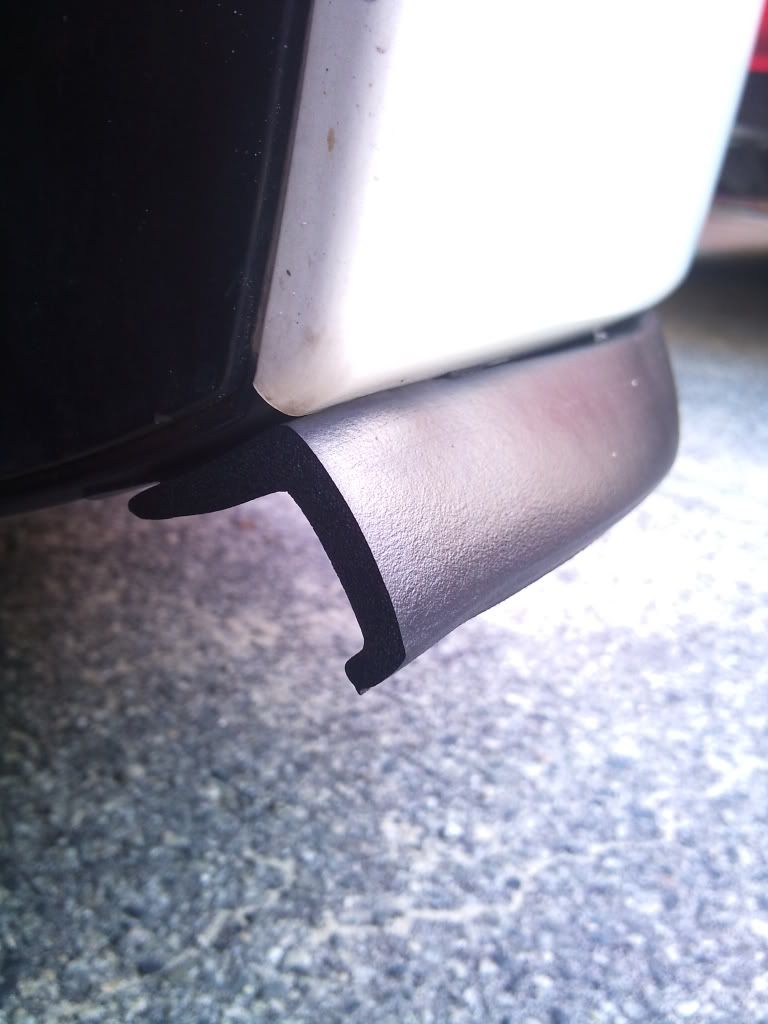
A couple more profile shots...
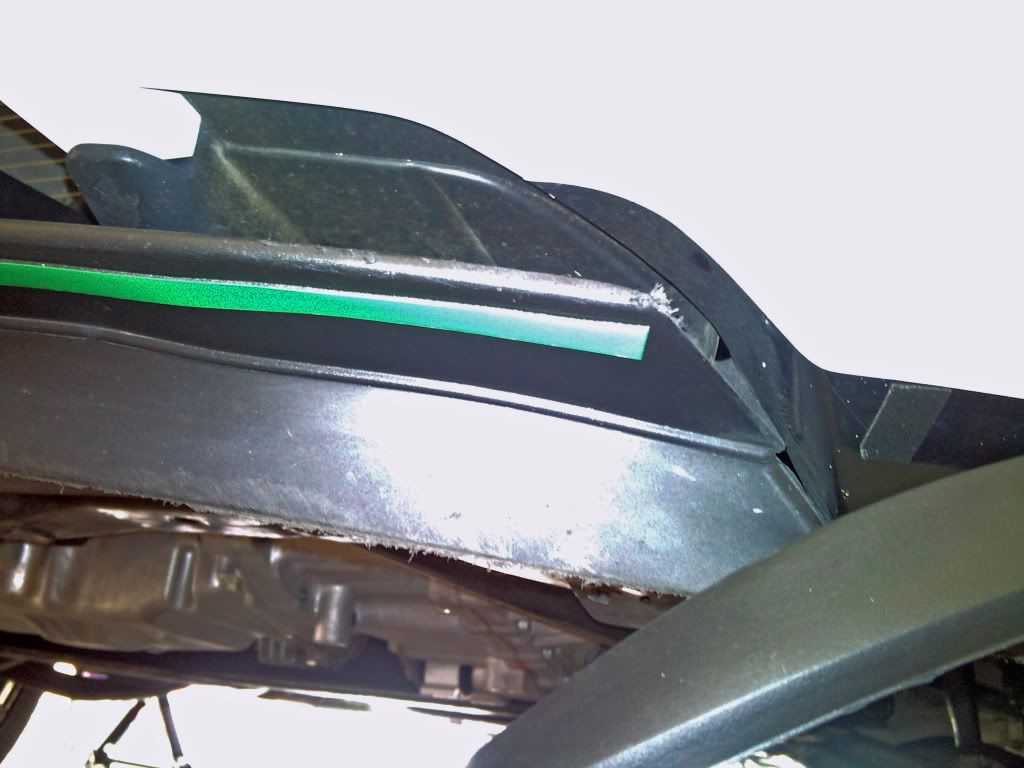
Profile shot of the rubber flushed with the bumper.
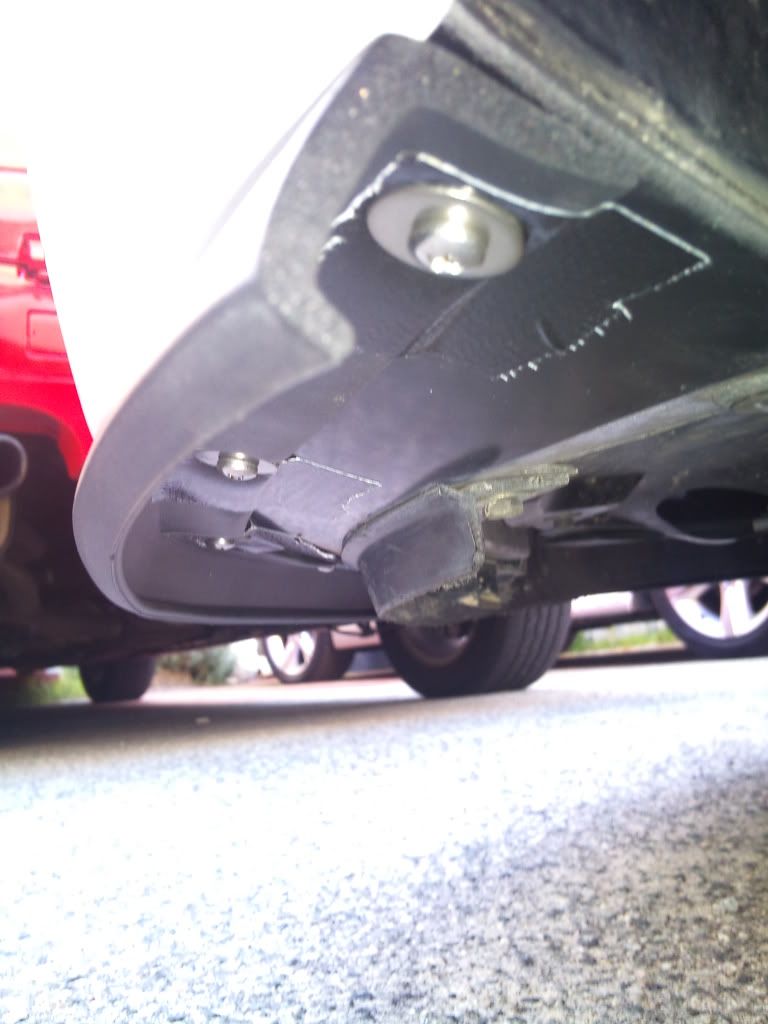
Underside mounting shot displaying screws. Gaffa tape was used so the screw didn't rip the rubber when fixing, also to provide extra hold.
Junior Member
Personally I prefer Toddy's version
How may I service you...
Toddy's came from a local rubber outlet retailer. There should be places that sell foam and rubber in the UK? Maybe a hardware store or similar. We pretty much went and had a look. Measured, purchased and tried out the install. If you got folks here in OZ it might be an idea to get them to send it over, maybe try a 4WD accessory place or online sales for 4WD Fender parts locally? Mine came from the US and wasn't exactly the product I ordered but nevertheless seemed to do the job for now anyway. I purchased mine from Amazon.com.
Amazon.com: Frost King G16 Nail-On Rubber Garage Door Bottom Seal, 2-1/4-Inch by 16-Foot, Black: Home Improvement
With great power comes great fuel consumption...
M P S - 6 - RR | Cobb AP | CAI | TIP | ATP GTX28R | 3.25" TMIC | SS DP | REM | 3" Zorst | SSP Anchors & Countershift | DBA Rotors | K/Springs | Upper & Lower Bracing | Alpine Type S 12" sub MRP-M500 Amp| Grille | STi Lip | Shark Fin | 6000K HID | Fog Light Tint | Twin DEFI gauges | Custom Decals & Badges | LED lighting | CF Mirrors & Pillars | Black rims Red callipers
Forum Addict
The product i used is designed for 4WD's to screw onto their wheel arches so their tyres dont over hang the guards. I did see it on ebay last night. I'll have another look and see if i can find it again
 Posting Permissions

 Reply With Quote