


I take no responsibility for any loss or damage caused from following any of my DIY step by step walkthroughs. Jarreth.
DIY Removal and Clean of the Standard Top Mount Intercooler
1. Start by undoing the two bolts holding on the Plastic top cover-
2. Unclip the rear of the plastic cover by pulling upwards on it, then remove the cover and put it aside.
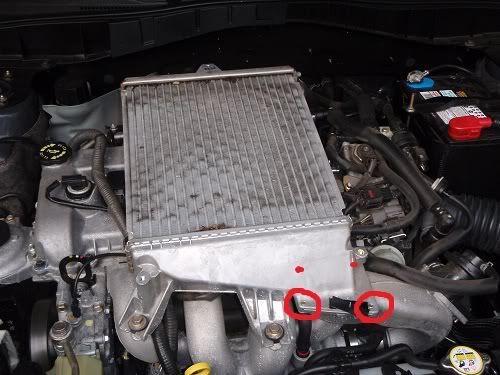
3. Next, there are 3 bolts that hold the intercooler in place, start by loosening all of the bolts to the same point and then remove
4. Then undo the clamp that holds on the rear intercooler pipe (note- it may be stuck on the rubber even when you have lossened it, try using a flat head screwdriver to gently lever the clamp away from the rubber bit by bit)
5. Once the clamp is off and you have pulled the intercooler metal pipe out from the rubber pipe the intercooler should begin to move around a bit more
6. CHOOSE YOUR PATH - You can either choose the 'HARD' path like i did and take the intercooler off from the metal connector before the rubber front pipe OR choose the 'EASY' path and loosen the front lower intercooler pipe and remove the cooler from there.
If so skip steps number 7 and 8. and refer to the pics below--
You'll have to undo the Blow off Valve and the rubber intercooler pipe below it.
7. Remove the four bolts like the picture below from the top intercooler metal pipe, make sure you keep the gasket safe and do not damage it!
8. The back 2 can be REALLY tricky, i found by propping up the intercooler with something soft (refer to photos) and then you can manipulate the intercooler a bit more when using a 10mm spanner to undo the bolts. (BE PATIENT)
9. Once all undone, It should look like this-
10. Grab something that wont go down the holes and clog up the two intercooler holes (i used old underpants! Worked a treat! )
11. Now begin cleaning out the intercooler, saturate the outside in degreaser
12. Rinse off with clean water (higher pressure than usual but not too high as it could bend the fins)
13.Repeat steps 11 and 12 until the outside of the intercooler has no oil, dust, grime left on it
14. Now fill the intercooler full of degreaser starting from one end until it starts to pour out the other
15. Clog both ends with something that will not let the water\degreaser out (Undies worked well again) and shake the intercooler vigorously
16. Flush the intercooler out with water removing all the old degreaser\water mixture.
17. Repeat the process from steps 14-16 a least twice, spraying the degreaser in alternate inlet holes each time
18. Last mixture i used was degreaser, a small amount of mentholated spirits and water, then repeat steps 15-16
19. Lastly flush the intercooler with clean water until fresh clean water begins to come from the opposite inlet pipe
20. Check the intercooler core for 'bubbles' forming on\in the fins, If so, then there is still degreaser, metho throughout the intercooler!
21. I found hanging the intercooler up and spraying water in and out of it, through it, round it, over it etc worked the best for me
22. Once you can not see anymore bubbles through the fins let the intercooler dry in the sun
(I decided to wash and clean the top cover as it was a bit dirty and im anal lol )
23. Once you have left it for half an hour grab the intercooler and shake it, you'll find alot of water will come out
24. While your waiting for it to dry, start straightening up some of the fins
25. Again, wait half hour or so and shake out the intercooler
27. Repeat steps 23-25
28. Once the intercooler is dry you can start to re fit the unit to the car
27. Start by refitting the rear rubber intercooler pipe, leave it loose for the time being
28. Now if you went the 'HARD' way the next steps may be useful
29. Prop the intercooler up from the rear again
30. Refit the gasket and insert one of the bolts to hold the gasket in place whilst fitting the front intercooler pipe
31. Half tighten what bolts you can get to easily
32. [THIS WAS VERY TIGHT AND COULD BE DIFFICULT] The rear left bolt is tight, refer to the photos on how to perhaps get in there to get the bolt in, hand screw the bolt in first and then SQUEEZE your hand in there with the 10mm spanner to tighten up the bolt.
33. Tighten up all 4 bolts accordingly
34. Remove the 'props' and Push the rear intercooler pipe all the way in, then re fit the 3 intercooler bolts as you took them out
35. Re check all bolts before you refit the top cover
36. Have a drink...
37.... DONE


 Reply With Quote


 .. makes me wanna clean my radiator


